 | | | | | | | | | | | | | | | | | | | |
|
| | | | | | |

|
|
Apple really out did itself with Blue Box. Even though it is not as esthetically pleasing as Mac OS X's "Classic", it is very stable and has benefits over the standard Mac OS running on the same hardware (mainly the fact that memory management is done by Rhapsody).
Even given it's wonderful achievements, Apple did fall short on one aspect of Blue Box... size. In it's default configuration, Blue Box is too small to be useful (about 100 MB for Rhapsody 5.1 and up to 250 MB for Rhapsody 5.6). Fortunately we can fix that.
Requirements
We have only one fixed limitation in expanding Blue Box: disk images have a maximum size of 2 GB. This is actually a limitation of Mac OS 8/9 as the largest single file size that they can handle is 2 GB.
What else do we need? It would be helpful to have enough room on your Rhapsody drive to hold the final disk image (so that is something to take into account). You'll need to have enough space on an HFS+ volume to make the image (including enough space to hold the original image also). Mac OS 8/9 (this can include Blue Box, but you can't be expanding the same image as you are running, so keep that in mind), Disk Copy 6.3.x (I used 6.3.3), ResEdit (I used version 2.1.3) and a FTP client (if moving the image to another system, I use Fetch 3.0.3).
First things first
Every user in Rhapsody is given their own Blue Box disk image. You are given this image the first time you run Blue Box and you'll find your image here:
/Local/Library/MacOS/Users/UserName/StartupDisk.img
Where "UserName" is your login name.
This image is set up with read/write permissions for you, so you can move it as you see fit (though it must be back in this same place when you start up Blue Box).
Depending on your FTP client, you may not be able to navigate to this directory. In that case, you need to move it to your home directory. From there you should be able to get it to another Mac OS system where you can modify it.
The System doesn't recognize this file
Rhapsody doesn't use resource forks, Mac OS 8/9 does. The disk image is coming from Rhapsody without any resource information for the Mac OS to read, so it is missing it's file type and creator type (unless your FTP client adds it, in which case you can skip the next step). This is where ResEdit is needed.
|
|
| | | | |
|
|
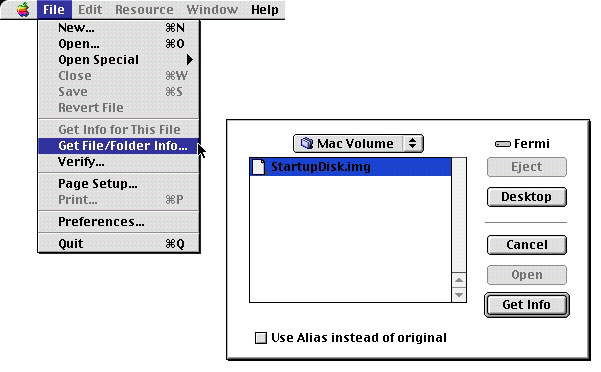
| Launch ResEdit, it'll sit at the "jack-in-the-box" screen until you click on it. Often it'll bring up an open window... close it by clicking cancel. Under "File" you'll see "get info", that is what we need. In the open window for that you'll need to navigate to the StartupDisk.img. |
|
|
|
|
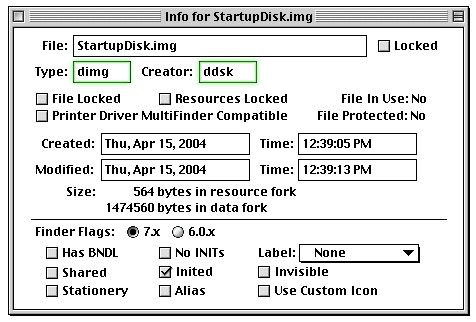
When you open the info window you'll have two areas where you need to add file type and creator. You should add (or replace if information is there that is different) "dimg" and "ddsk" respectively (see image below)
|
|
| |
|
|
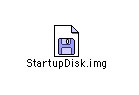
What you should end up with is a file that has a disk image icon (supplied by the Finder) like this one.
|
|
| | | | | | | |
|
|
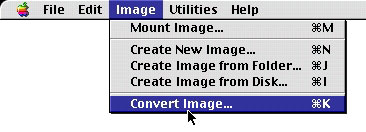
Growing your image
Now that the system sees your original image as a disk image, Disk Copy should be able to work with it. Open Disk Copy and go to the "Image" menu down to "Convert Image..."
|
|
| | | | | |
|
|
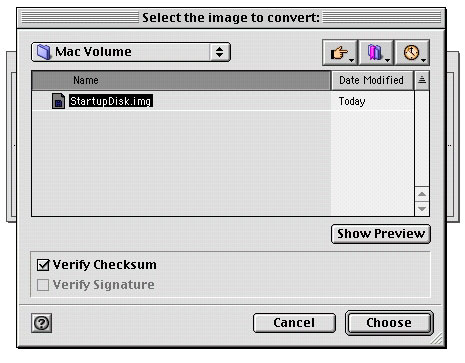
| When presented with a selection window, select your original image and hit "choose". |
|
| | |
|
|
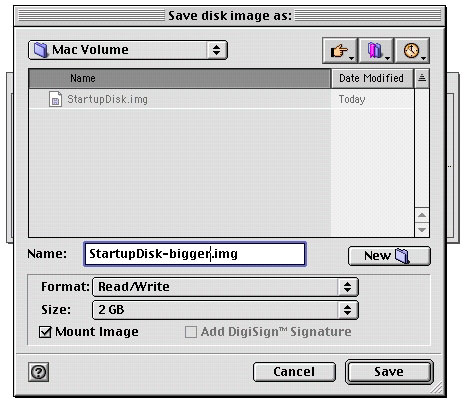
| In the Save window, you select the format (Read/Write) and the size (what ever fits your needs and space up to 2 GB). Then give it a new name (I picked something easy to get back to the old name later). |
|
| | | |
|
|
You should now have a new disk image with everything that you originally had in the old one but with much more room.
Back to Rhapsody
With your new image ready, move it back to your Rhapsody system (most likely via FTP).
Once you have it back on your system, either remove the original image from the Blue Box directory (if you haven't moved it already) and place the new image in it's place. Rename the new image "StartupDisk.img" and fire up the MacOS.app. You should now have a lot more welcome space.
If everything has worked out correctly, you can delete the images left over on your Rhapsody and Mac OS systems (or store them for a back up).
|
|
| | | | | | | | |

|
